코알못
5분 안에 구축하는 Nexus 본문

회사에서 만든 공통 소스를 하나의 라이브러리로 관리하고자 하였으며 라이브러리를 관리하고 저장할 저장소가 필요하였다.
Nexus 를 사용하면 maven 과 gradle 을 통해 쉽게 라이브러리를 올리고 받을수 있어 편리하다.
그럼 Nexus 를 구성해보자!
일단 nexus 를 설치한다.
$ brew install nexus
시작은 아래와 같다.
$ brew services stop nexus
$ brew services start nexus
$ brew services restart nexus
공식 문서를 참고한다.
- https://guides.sonatype.com/repo3/quick-start-guides/proxying-maven-and-npm/
Nexus Repository Manager - Proxying Maven and npm Quick Start - Sonatype Guides
If you’re new to repository management with Nexus Repository Manager 3, use this guide to get familiar with configuring the application as a dedicated proxy server for Maven and npm builds. To reach that goal, follow each section to: Install Nexus Reposi
guides.sonatype.com
1) 설치 디렉토리 생성
$ mkdir nexus2) nexus를 다운로드 한다. (저자의 경우 최신버전인 3.37.3 다운로드 링크를 복사 한다.)
Download
Nexus Repository OSS is distributed with Sencha Ext JS pursuant to a FLOSS Exception agreed upon between Sonatype, Inc. and Sencha Inc. Sencha Ext JS is licensed under GPL v3 and cannot be redistributed as part of a closed source work.
help.sonatype.com
$ cd nexus
$ wget https://download.sonatype.com/nexus/3/nexus-3.37.3-02-mac.tgz
3) 압축을 푼다
$ tar -xvf nexus-3.37.3-02-mac.tgz
$ ls -all
total 526272
drwxr-xr-x   5 hongyoolee  staff        160  2  1 14:24 .
drwxr-xr-x  26 hongyoolee  staff        832  2  1 14:15 ..
drwxr-xr-x  13 hongyoolee  staff        416  2  1 14:24 nexus-3.37.3-02
-rw-r--r--   1 hongyoolee  staff  253373030 12 30 04:57 nexus-3.37.3-02-mac.tgz
drwxr-xr-x   3 hongyoolee  staff         96  2  1 14:24 sonatype-work
4) nexus 시작
$ cd nexus-3.37.3-02
$ ./bin/nexus run
..
-------------------------------------------------

Started Sonatype Nexus OSS 3.37.3-02

-------------------------------------------------
5) 관리 UI 접속
- http://localhost:8081/

6) 로그인 하기
sign in 버튼 클릭시 아래와 같이 admin 유저에 대한 패스워드 파일 위치를 알려준다.
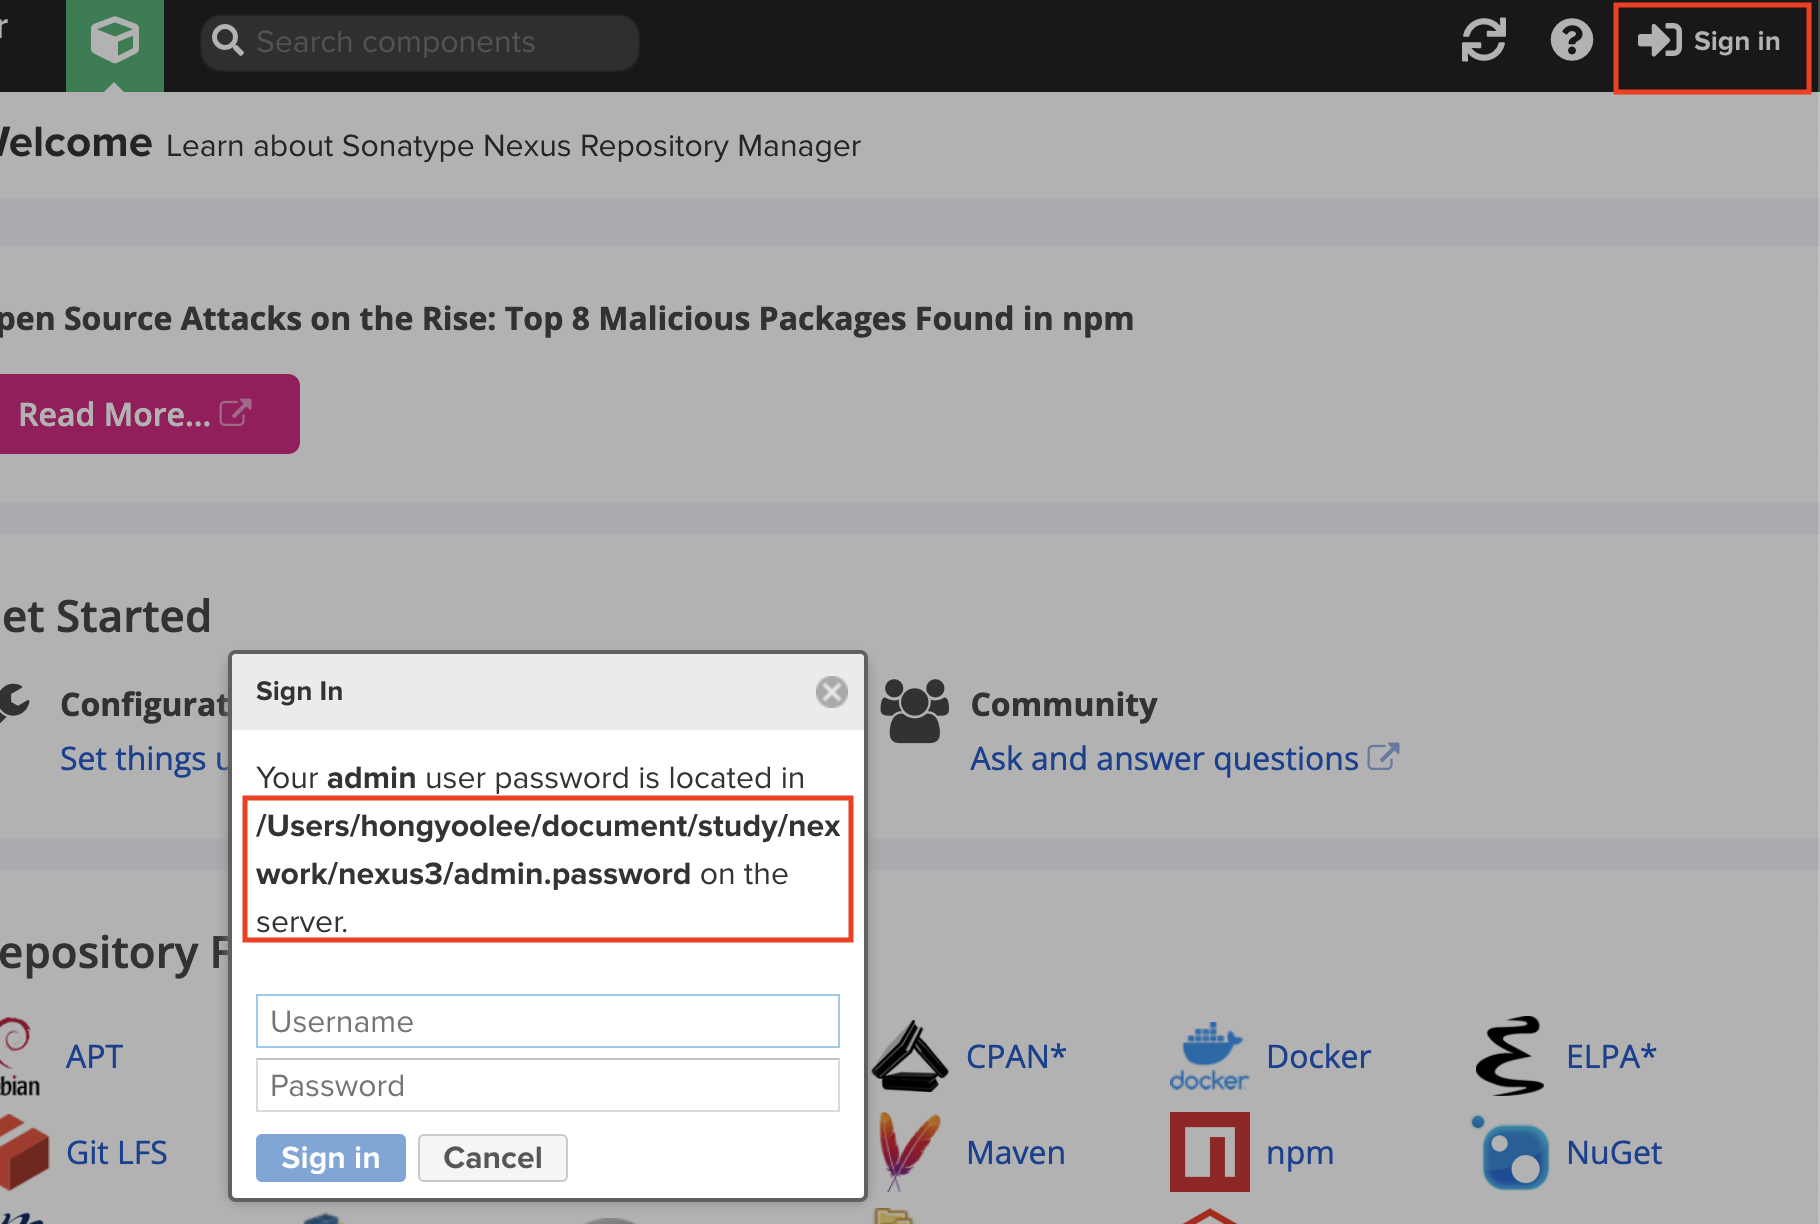
해당 패스워드 파일 내용을 복사해 패스워드를 넣는다.
$ cat /Users/hongyoolee/document/study/nexus/sonatype-work/nexus3/admin.password
...
로그인 완료시 초기 비밀번호 셋팅창이 뜨며 비밀번호를 변경한다.
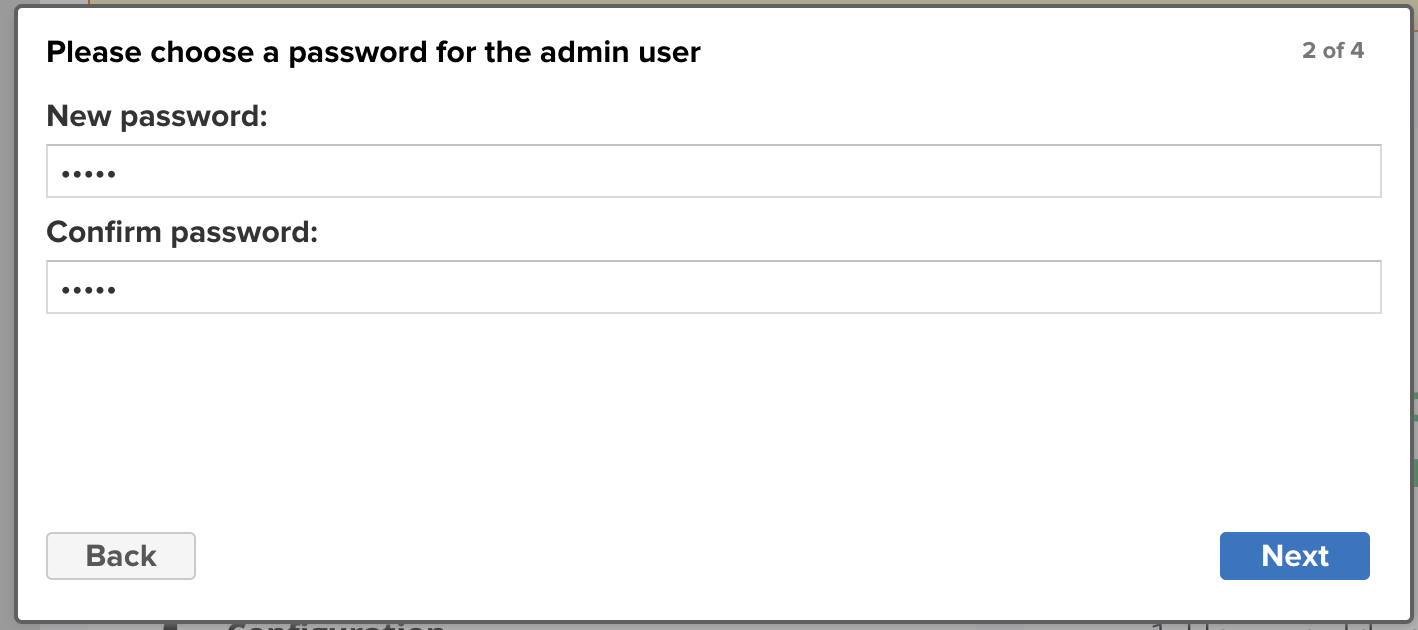
로그인 안하고도 해당 저장소를 이용할 수 있도록 할건지 여부를 묻는데 보안상 익명 사용자 접속을 disable 하는것이 좋다.

finish 를 눌러 완료 한다.

자 그럼 이제 gradle 과 nexus 를 연동하여 저장소에 업로드, 다운로드 해본다.
- 참고 공식 문서 (https://help.sonatype.com/repomanager2/maven-and-other-build-tools/gradle)
우선 모듈을 2개 생성한다.
- nexus-put : 라이브러리 업로드 모듈
- nexus-get : 라이브러리 사용 모듈

아래 정리한 문서가 있으니 보고 생성해본다.
:: https://co-de.tistory.com/18
[Gradle] 실행 가능한 JAR 파일 만들기 (with 스프링 멀티 모듈)
간단한 프로젝트를 만들어 보겠다! - 모듈 3개 core-util : 공통으로 사용하는 메소드 모듈 run-a , run-b: base64로 암호화된 값을 보내면 디코딩 한 후 해당 메세지에 모듈명을 붙인뒤, Base64로 암호화해
co-de.tistory.com
이제 nexus-put에 간단한 함수를 하나 만든다. (입력한 정수를 모조리 더하는 함수다)
@Component
public class CommonUtils {
    public static int allAdd(int ...data){
        int rtnData = 0;
        for(int i : data){
            rtnData += i;
        }
        return rtnData;
    }
}
junit 을 이용해 해당 함수가 정상적으로 돌아가는지 확인하면 정상적으로 돌아간것을 확인할 수 있다.

이제 함수를 생성하였으니 해당 라이브러리 파일을 업로드 하기위한 설정을 추가한다.
// gradle.properties
넥서스 아이디/비번
repoUser=admin
repoPassword=admin
// build.gradle
project(':nexus-put') {
    version = '0.0.1-SNAPSHOT'
    // 실행가능한 app용일때는 bootjar, 라이브러리용일때는 jar 를 사용
    bootJar {
        enabled = false
    }
    jar {
        enabled = true
    }
    artifacts {
        publishing {
            repositories {
                maven {
                    if (project.version.toString().endsWith("SNAPSHOT")) {
                        url "도메인/repository/maven-snapshots/"
                    } else {
                        url "도메인/repository/maven-releases/"
                    }
                    credentials {
                        username project.repoUser
                        password project.repoPassword
                    }
                }
            }
            publications {
                maven(MavenPublication) {
                    artifact("build/libs/nexus-put-0.0.1-SNAPSHOT.jar") {
                        extension 'jar'
                    }
                }
            }
        }
        // 의존성 오류 방지
        publishMavenPublicationToMavenRepository.dependsOn(jar)
    }
}
이제 업로드를 위해 그레들 명령어를 입력한다.
$ ./gradlew clean build -x test publish그러면 아래와 같이 nexus URL을 http > https 로 변경하라는 오류가 발생한다.
Execution failed for task ':nexus-put:publishMavenPublicationToMavenRepository'.
> Failed to publish publication 'maven' to repository 'maven'
   > Using insecure protocols with repositories, without explicit opt-in, is unsupported. Switch Maven repository 'maven(http://localhost:8081/repository/maven-snapshots/)' to redirect to a secure protocol (like HTTPS) or allow insecure protocols. See https://docs.gradle.org/7.3.3/dsl/org.gradle.api.artifacts.repositories.UrlArtifactRepository.html#org.gradle.api.artifacts.repositories.UrlArtifactRepository:allowInsecureProtocol for more details.
이를 위해 도메인을 생성 한뒤 ssl 을 등록한다.
- 무료 도메인 생성 방법
:: https://co-de.tistory.com/69?category=884534
내 도메인을 만들어보자!
아래와 같이 내가 만든 서비스가 있어 localhost:8080으로 접속하여 확인하고 테스트를 한다. 이렇게 만들어 두면 다른사람들에게 내가 만든 홈페이지나 기능을 보여주고 싶기도 하다. 물론 IP:PORT로
co-de.tistory.com
생성한 도메인만 아래 명령어에 채워서 입력하여 키를 생성한다.
$ sudo openssl req -nodes -sha256 -newkey rsa:2048 -keyout server.key -out server.csr -subj "/C=US/ST=Unspecified/L=Unspecified/O=Sonatype/OU=Example/CN=*.[생성한도메인]"
$ sudo openssl x509 -req -days 7000 -in server.csr -signkey server.key -out server.crt -sha256
$ sudo openssl pkcs12 -export -in server.crt -inkey server.key -out serverStore.p12 -name "jetty"
$ sudo keytool -importkeystore -srckeystore serverStore.p12 -srcstoretype pkcs12 -destkeystore keystore.jks -deststoretype pkcs12   -alias "jetty"  -ext "SAN=DNS:nexus-yoolee.tk" -ext "BC=ca:true"

// 생성된 keystore.jks 파일을 {넥서스설치경로}/etc/ssl 에 복사한다.
$ sudo cp /etc/ssl/keystore.jks /Users/hongyoolee/document/study/nexus/nexus-3.37.3-02/etc/ssl/
넥서스 ssl 관련 설정을 추가한다.
- application-port-ssl 을 추가
- nexus-args 에 ${jetty.etc}/jetty-https.xml 를 추가한다.
$ vi {넥서스설치경로}/etc/nexus-default.properties
## DO NOT EDIT - CUSTOMIZATIONS BELONG IN $data-dir/etc/nexus.properties
##
# Jetty section
application-port=8081
application-port-ssl=8443
application-host=0.0.0.0
nexus-args=${jetty.etc}/jetty.xml,${jetty.etc}/jetty-http.xml,${jetty.etc}/jetty-requestlog.xml,${jetty.etc}/jetty-https.xml
nexus-context-path=/

# Nexus section
nexus-edition=nexus-pro-edition
nexus-features=\
 nexus-pro-feature

nexus.hazelcast.discovery.isEnabled=true
생성한 키의 비밀번호 정보를 넣어준다.
$ vi {넥서스설치경로}/etc/jetty/jetty-https.xml
<Set name="KeyStorePath"><Property name="ssl.etc"/>/keystore.jks</Set>
    <Set name="KeyStorePassword">비밀번호</Set>
    <Set name="KeyManagerPassword">비밀번호</Set>
    <Set name="TrustStorePath"><Property name="ssl.etc"/>/keystore.jks</Set>
    <Set name="TrustStorePassword">비밀번호</Set>
넥서스를 재시작 한다.
$ kill -9 넥서스port
$ ./bin/nexus run
정상으로 https 가 접속 된다. 그러나 임의로 생성한 키이므로 https 에 대해 주의 요함 경고가 발생하며 경고를 없애기 위해서는 신뢰할수 있는 ssl 인증서 발급 기관에서 인증서를 발급하여 등록해야 한다.
상용 서비스에 등록하기 위해서는 필요한 부분이므로 참고사항의 'ssl 인증서 발급 및 nexus 등록' 을 보고 설정 하면 된다.

Nexus 2.10 이하 버전에서는 ssl 사용 가능하나 초과 버전은 TLS 를 사용해야 하여 초과 버전이라면 참고사항의 'nexus SSL 요청 불가 오류' 을 보고 설정하면 된다.
이제 jar 파일을 업로드 해보자
$ ./gradlew clean build -x test publishnexus 가보면 scapshots 디렉토리에 정상적으로 업로드 되었다.

이제 nexus-get을 통해 함수를 사용해본다.
// build.gradle
allprojects {
	repositories {
        mavenCentral()
        maven{
            url "넥서스도메인/repository/maven-public/"
            credentials {
                username project.repoUser
                password project.repoPassword
            }
        }
    }

}
project(':nexus-get'){
    dependencies {
        implementation 'com.code:nexus-put:0.0.1-SNAPSHOT'
    }
}
// service
@Service
public class AddService {
    public int add(int a, int b){
        int result = CommonUtils.allAdd(a,b);
        return result;
    }
}
junit 으로 테스트 해본다.
@Autowired
    private AddService addService;

    @Test
    void contextLoads() {
        log.error("## => {}", addService.add(1,2));
    }
라이브러리에 있는 함수를 가져와 계산하여 3이 정상적으로 나온다!

코드는 아래 깃 에서 다운로드 가능하다.
:: https://github.com/works-code/nexus
GitHub - works-code/nexus: 넥서스(nexus) 스타터 코드
넥서스(nexus) 스타터 코드. Contribute to works-code/nexus development by creating an account on GitHub.
github.com
끝!
<참고 사항>
1. ssl 인증서 발급 및 nexus 등록
- 무료 ssl 인증서
Free SSL Certificates and SSL Tools - ZeroSSL
zerossl.com
무료 ssl 인증서를 생성시 위에서 생성한 도메인 입력후 CNAME 을 이용한 인증을 이용하여 아래 name , target 정보를 가져온뒤

무료 도메인 사이트 freedom의 도메인 관리 페이지 가서 입력 한다.

그리고 무료 ssl 인증서 사이트에서 다음단계를 누르면 바로 도메인이 확인 된다.

인증서를 다운한다.
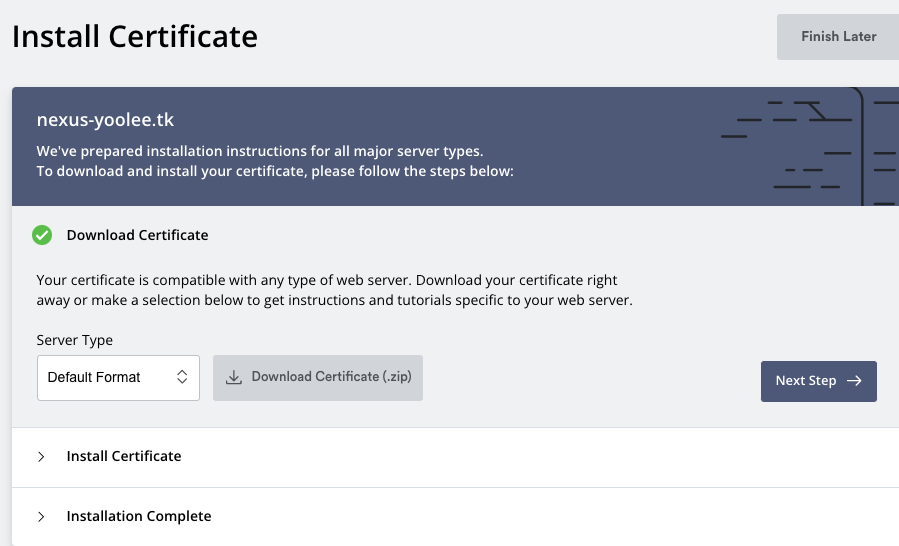
다운 받은 인증서의 압축을 푼뒤 해당 경로에서 p12 인증서 파일을 만든뒤, jks 인증서 파일을 만들고 인증서를 넥서스 인증서 경로에 둔다.
$ sudo openssl pkcs12 -export -in certificate.crt -inkey private.key -out server.p12 -name "jetty"
$ sudo keytool -importkeystore -srckeystore server.p12 -srcstoretype PKCS12 -destkeystore keystore.jks -deststoretype pkcs12 -alias "jetty"
$ sudo cp keystore.jks {넥서스설치경로}/etc/ssl/
설정은 위와 동일하게 두고 재기동만 진행한다.
$ kill -9 넥서스port
$ ./bin/nexus run
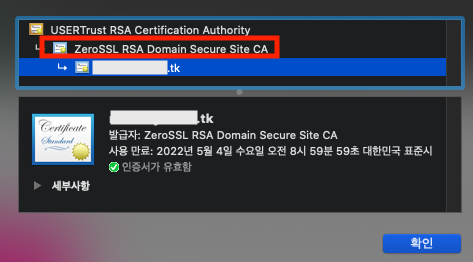
다시 접속해보면 이제 오류 표기가 안나는것을 볼 수 있으며 자물쇠를 클릭하여 상세 확인 해보자!

왼쪽부터 차례대로 클릭해서 들어가보면
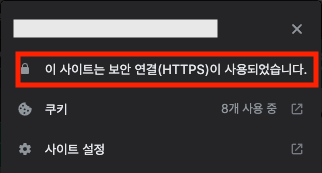
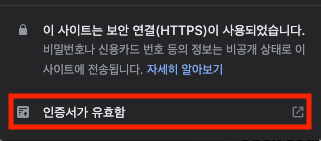
인증서를 발급한 zerossl 에서 발급한 인증서이며 인증서가 유효하다고 나온다.
2. certbot 인증서 생성시 사용중인 포트 오류
- 에러
Could not bind TCP port 80 because it is already in use by another process on
this system (such as a web server). Please stop the program in question and then
try again.
- 해결
// 사용중인 포트의 PID 출력
$ sudo lsof -i :80
// 해당 PID 죽이기
$ sudo kill -9 출력된 PID
만약 죽여도 계속적으로 80포트가 살아난다면 nginx나 내장 apach 가 떠있는지 확인한다.
저자는 apach 가 떠있어서 직접 죽여 해결했다.
$ sudo apachectl stop3. 의존성 오류
- 오류
':nexus-put:bootJar' without declaring an explicit or implicit dependency.- 해결
dependsOn 의존성을 추가한다.
artifacts {
        publishing {
        ...
        }
	publishMavenPublicationToMavenRepository.dependsOn(bootJar)
}
4. nexus SSL 요청 불가 오류
Nexus 2.10 이하 버전에서는 ssl 사용 가능하나 초과 버전은 TLS를 등록한다.
Execution failed for task ':nexus-put:publishMavenPublicationToMavenRepository'.
> Failed to publish publication 'maven' to repository 'maven'
   > Could not GET 'https://www.nexus-yoolee.tk/repository/maven-snapshots/com/code/nexus-put/0.0.1-SNAPSHOT/maven-metadata.xml'.
      > The server may not support the client's requested TLS protocol versions: (TLSv1.2, TLSv1.3). You may need to configure the client to allow other protocols to be used. See: https://docs.gradle.org/7.3.3/userguide/build_environment.html#gradle_system_properties
         > PKIX path building failed: sun.security.provider.certpath.SunCertPathBuilderException: unable to find valid certification path to requested target
자 TLS 는 Let's Encrypt 무료다..
:: https://letsencrypt.org/ko/
Let's Encrypt - 무료 SSL/TLS 인증서
letsencrypt.org
certbot 을 통해 설치하는것이 좋다고 가이드되어 있어 이용하여 설치 한다.
:: https://certbot.eff.org/instructions
Certbot Instructions
Tagline
certbot.eff.org
사용하고 있는 software, os 선택하면 가이드가 나온다. 저자는 mac 이므로 아래와 같다.
$ brew install certbot
$ sudo certbot certonly -d 도메인
- - - - - - - - - - - - - - - - - - - - - - - - - - - - - - - - - - - - - - - -
1: Apache Web Server plugin (apache)
2: Nginx Web Server plugin (nginx)
3: Spin up a temporary webserver (standalone)
4: Place files in webroot directory (webroot)
- - - - - - - - - - - - - - - - - - - - - - - - - - - - - - - - - - - - - - - -
Select the appropriate number [1-4] then [enter] (press 'c' to cancel): 3
Successfully received certificate.
Certificate is saved at: /etc/letsencrypt/live/도메인/fullchain.pem
Key is saved at:         /etc/letsencrypt/live/도메인/privkey.pem
완료 됐다는 메세지가 나오고 pem 파일은 jks 로 변경하여 이전과 동일하게 nexus 의 ssl 디렉토리에 넣고 재기동 한다.
$ cd /etc/letsencrypt/live/도메인/
$ sudo openssl pkcs12 -export -out server.p12 -in /etc/letsencrypt/live/도메인/fullchain.pem -inkey /etc/letsencrypt/live/도메인/privkey.pem
$ sudo keytool -importkeystore -srckeystore server.p12 -srcstoretype PKCS12 -destkeystore keystore.jks

$ sudo cp keystore.jks ../nexus-3.37.3-02/etc/ssl
재기동 한다.
$ kill -9 넥서스port
$ ./bin/nexus run
이제 https://도메인 접속하여 인증서 확인하면 변경 된것을 확인할 수 있다.
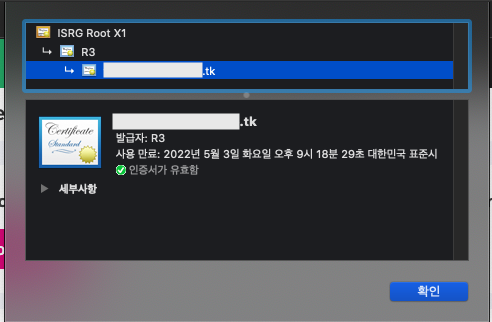
5. 모듈 자체가 문제있는지 보고 싶을때
타 모듈을 가져와 컴파일 할 수 있다.
dependencies {
	implementation project(':nexus-put')
}
6. 외부 라이브러리 Cannot resolve symbol
- 에러
외부 라이브러리에 있는 클래스는 자동 완성 되나 오류 발생
Cannot resolve symbol 클래스명- 해결
저자의 경우 jar 파일을 bootjar 로 만들어 해당 클래스를 찾지 못한것으로 jar 를 통해 만들어 지도록 아래와 같이 수정하여 라이브러리를 nexus 에 업로드후 새 버전으로 받아온다. (변경사항 라이브러리에 업로드시 버전을 새로 따야된다. 같은 버전으로 올릴시 수정사항이 반영되지 않는다.)
bootJar {
        enabled = false
    }
jar {
        enabled = true
}'JAVA' 카테고리의 다른 글
| 서버 모니터링 툴(visualVM) 을 붙여보자! (0) | 2022.02.19 |
|---|---|
| 5분 안에 구축하는 Swagger (API 규격서) (2) | 2022.02.05 |
| 5분 안에 구축하는 hystrix - Turbine (0) | 2022.01.30 |
| 5분 안에 구축하는 hystrix - Dashboard 연동 (0) | 2022.01.30 |
| 5분 안에 구축하는 hystrix (0) | 2022.01.30 |


