
| 일 | 월 | 화 | 수 | 목 | 금 | 토 |
|---|---|---|---|---|---|---|
| 1 | 2 | 3 | 4 | 5 | 6 | 7 |
| 8 | 9 | 10 | 11 | 12 | 13 | 14 |
| 15 | 16 | 17 | 18 | 19 | 20 | 21 |
| 22 | 23 | 24 | 25 | 26 | 27 | 28 |
| 29 | 30 | 31 |
- Docker
- hive
- Jenkins
- spring
- java
- 자바
- Cluster
- aws
- redash
- 간단
- login
- 머신러닝
- 젠킨스
- SpringBoot
- ec2
- 자동
- EMR
- Mac
- 로그인
- Redis
- Kafka
- vue
- config
- 설정
- 예제
- 클러스터
- Zeppelin
- gradle
- fastcampus
- 레디스
- Today
- Total
코알못
5분안에 구축하는 OAuth 서버 - 03 본문

- 로그인 실패, 성공 커스텀 구현
- 토큰 발행 커스텀 구현
- 토큰(jwt)에 사용자 정보 추가
로그인 실패/성공시 구현해야하는 비즈니스 코드는 회사 마다 각각 다르고 커스텀 하게 코드를 작성해야 하며, 지금부터 설정해본다!
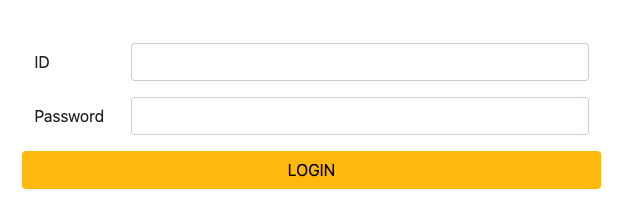
일단 기존에 구현한 코드에서는 아래와 같이 로그인 화면이 나오고 로그인 실패시 아무 문구가 나오지 않는다.


실패 성공 커스텀 페이지는 기존 spring security 클래스를 상속하여 구현한다.
// 실패 커스텀 페이지
@Slf4j
public class CustomFailHandler extends SimpleUrlAuthenticationFailureHandler {

    @Override
    public void onAuthenticationFailure(HttpServletRequest request, HttpServletResponse response, AuthenticationException exception) throws IOException, ServletException {

        if(exception instanceof UsernameNotFoundException){
            log.error("### => {}", exception.getMessage());
            response.sendRedirect("http://localhost:8081/oauth/login?error="+exception.getMessage());
        }

    }
}
// 성공 커스텀 페이지
@Slf4j
public class CustomSuccessHandler extends SavedRequestAwareAuthenticationSuccessHandler {

    @Override
    public void onAuthenticationSuccess(HttpServletRequest request, HttpServletResponse response, Authentication authentication) throws ServletException, IOException {
        log.info("### login success => {}", authentication.getAuthorities());
        super.onAuthenticationSuccess(request, response, authentication);
    }
}
// 설정
public class SecurityConfig extends WebSecurityConfigurerAdapter {

    @Override
    protected void configure(HttpSecurity http) throws Exception {
        http.csrf().disable() // csrf 공격을 막기 위해 state 값을 전달 받지 않는다
                .formLogin() // 로그인 페이지 설정
                .loginPage("/oauth/login")
                .failureHandler(failureHandler()) // 로그인 실패 custom
                .successHandler(successHandler()) // 로그인 성공 custom
                .and()
                .httpBasic(); // http 통신으로 basic auth를 사용 할 수 있다. (ex: Authorization: Basic bzFbdGfmZrptWY30YQ==)
    }

    @Bean
    public AuthenticationFailureHandler failureHandler(){
        return new CustomFailHandler();
    }

    @Bean
    public AuthenticationSuccessHandler successHandler(){
        return new CustomSuccessHandler();
    }

}
그리고 로그인 실패시 에러 코드에 대해 화면에 문구를 노출하기 위해 아래와 같이 controller 를 수정하며
error 파라미터로 받은 값을 model 에 넣어 화면에 노출할 문구를 뷰에서 쓸 수 있도록 한다.
@Controller
public class LoginController {

    @RequestMapping(value = "/oauth/login", method = RequestMethod.GET)
    public String login(@RequestParam(value = "error", required = false) String error, Model model){
        model.addAttribute("error", error);
        return "login";
    }
}
login 페이지는 error 문구를 쉽게 노출하기 위해 thymeleaf 를 사용하며 (th:text) html 태그에 쓸 수 있도록 선언을 한다.
<html lang="en" xmlns:th="http://www.thymeleaf.org">그리고 에러 문구 표기할 p 태그를 추가한다.
        <div class="mb-3 row">
            <p th:text="${error}"></p>
            <label for="username" class="col-sm-2 col-form-label">ID</label>
            <div class="col-sm-10">
                <input type="text" class="form-control" id="username" name="username">
            </div>
        </div>
자 이제 테스트 해본다!
로그인 페이지 접속 (http://localhost:8081/oauth/authorize?client_id=clientId&redirect_uri=http://localhost:8081/callback&response_type=code)
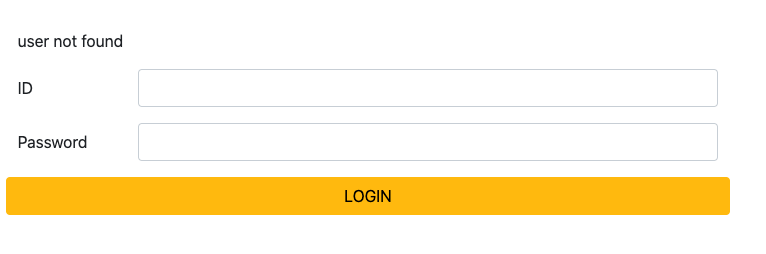
패스워드 불일치시, 없는 유저일시 아래와 같이 에러 문구가 표기 된다.

로그인 성공시에는 커스텀 페이지에서 남긴 성공 로그에 권한과 같이 출력된다.

그 다음은 토큰 발행 API 를 커스텀 하게 구현해본다!
아래와 같이 권한 동의 API 커스텀하게 구현한것과 동일하게 하면 되고, 기존 토큰 발행하는 메소드는 수정할 필요 없어 그대로(postAccessToken) 사용하고 아래 토큰 발행 방식에 따라 비즈니스 코드를 구현 한다.
public class LoginController {

    @Autowired
    private TokenEndpoint tokenEndpoint;

    // 코드 발행 커스텀
    @RequestMapping("/oauth/token")
    public ResponseEntity<OAuth2AccessToken> oauthToken(Principal principal, @RequestParam Map<String, String> parameters) throws HttpRequestMethodNotSupportedException {
        ResponseEntity<OAuth2AccessToken> response = tokenEndpoint.postAccessToken(principal, parameters);
        String grantType = StringUtils.defaultString(parameters.get("grant_type"), "");

        // 토큰 발행 방식에 따른 비즈니스 코드 작성
        if(StringUtils.equals("authorization_code", grantType)){

        }else if(StringUtils.equals("refresh_token", grantType)){

        }else if(StringUtils.equals("password", grantType)){

        }else if(StringUtils.equals("client_credentials", grantType)){

        }
        log.info("## get token => {} | {}", response.getBody().getAdditionalInformation(), grantType);
        return response;
    }
}
실행하여 테스트 해보면 토큰 발행시 아래와 같이 로그가 찍히며 성공적으로 토큰 발행된다.

그 다음은 access token(jwt)에 사용자 정보를 추가 하는 작업을 진행해본다. access_token 에 사용자 정보를 추가로 넘겨주면 resource 서버에서 사용자 정보를 한번더 조회하는것을 방지하여 DB 부하를 줄일 수 있다.
우선 사용자 정보를 넘겨줘야 읽어 올 수 있으나 전에 작성한 코드에서는 username 정보(id)만 넘겨주고 있어 그 부분을 아래와 같이 수정한다. (UsernamePasswordAuthenticationToken 에 username 이 아닌 info 객체를 넘기도록 수정)
@Slf4j
@Component
public class CustomAuthenticationProvider implements AuthenticationProvider {
	...

    // 로그인 버튼 클릭시 사용자 체크 메소드
    @Override
    public Authentication authenticate(Authentication authentication) throws AuthenticationException {
        String username = (String) authentication.getPrincipal();
        String password = (String) authentication.getCredentials();
        UserDetails info = userDetailService.loadUserByUsername(username);
        log.error("## => {} | {} | {}", username, password, info.getAuthorities());
        if(ObjectUtils.isEmpty(info)){
            throw new UsernameNotFoundException("user not found");
        }
        if(!StringUtils.equals(password, StringUtils.replace(info.getPassword(), "{noop}",""))){
            throw new UsernameNotFoundException("please password check");
        }
        // principal 정보는 jwt 토큰 생성시 추가정보 넣는데 사용하오니 필요한 정보는 여기서 넣어주세요.
        return new UsernamePasswordAuthenticationToken(info,password,info.getAuthorities());
    }
}
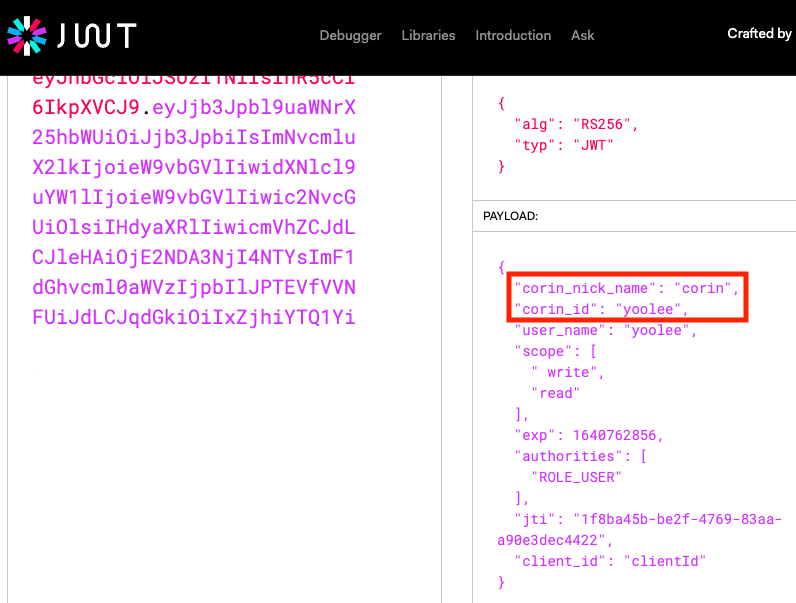
토큰에 사용자 정보를 추가로 넣기 위해 Enhancer 클래스를 생성하며, corin_id 와 corin_nick_name 이라는 정보를 추가한다.
package com.code.configuration;

import com.code.vo.User;
import lombok.extern.slf4j.Slf4j;
import org.springframework.security.oauth2.common.DefaultOAuth2AccessToken;
import org.springframework.security.oauth2.common.OAuth2AccessToken;
import org.springframework.security.oauth2.provider.OAuth2Authentication;
import org.springframework.security.oauth2.provider.token.TokenEnhancer;

import java.util.HashMap;
import java.util.Map;

// custom jwt token add info
@Slf4j
public class CustomTokenEnhancer implements TokenEnhancer {
    @Override
    public OAuth2AccessToken enhance(OAuth2AccessToken accessToken, OAuth2Authentication authentication) {
        User user = (User) authentication.getPrincipal();
        Map<String, Object> additionalInfo = new HashMap<>();
        additionalInfo.put("corin_id", user.getId());
        additionalInfo.put("corin_nick_name", user.getNickname());
        ((DefaultOAuth2AccessToken)accessToken).setAdditionalInformation(additionalInfo);
        return accessToken;
    }
}
그리고 enhancer 를 설정에 추가한다.
@EnableAuthorizationServer
@Configuration
public class Oauth2AuthorizationConfig extends AuthorizationServerConfigurerAdapter{
    ...

    // 인증, 토큰 설정
    @Override
    public void configure(AuthorizationServerEndpointsConfigurer endpoints) throws Exception {
        TokenEnhancerChain tokenEnhancerChain = new TokenEnhancerChain();
        tokenEnhancerChain.setTokenEnhancers(Arrays.asList(new CustomTokenEnhancer(), jwtAccessTokenConverter())); // 토큰 enhancer 객체 생성

        endpoints.authenticationManager(authenticationManager) // grant_type password를 사용하기 위함 (manager 지정 안할시 password type 으로 토큰 발행시 Unsupported grant type: password 오류 발생)
                .userDetailsService(userDetailService) // refrash token 발행시 유저 정보 검사 하는데 사용하는 서비스 설정
                //.tokenStore(tokenStore()) // jwt 로 변경시 토큰 저장하지 않아도 리소스 서버에서 차제적으로 체크 가능
                .tokenEnhancer(tokenEnhancerChain) // enhancer 설정
                .accessTokenConverter(jwtAccessTokenConverter())
                .approvalStore(approvalStore());
    }

    @Bean
    public JwtAccessTokenConverter jwtAccessTokenConverter(){
        // RSA 암호화 : 비 대칭키 암호화 : 공개키로 암호화 하면 개인키로 복호화
        KeyStoreKeyFactory keyStoreKeyFactory = new KeyStoreKeyFactory(new ClassPathResource("jwtkey.jks"), "corin1234".toCharArray());
        JwtAccessTokenConverter converter = new JwtAccessTokenConverter();
        converter.setKeyPair(keyStoreKeyFactory.getKeyPair("jwtkey"));

        // 대칭키 암호화 : key 값은 리소스 서버에도 넣고 하면 됨.
         /*JwtAccessTokenConverter converter = new JwtAccessTokenConverter();
        converter.setSigningKey("key");*/

        return converter;
    }

}
그리고 실행 하고 토큰 발행하면 아래와 같이 정보가 추가 된 것을 볼 수있다.
리소스 서버에 사용자 정보를 넘여주는거는 완료!
이제 리소스 서버에서 사용해본다!
토큰을 가져오는 메소드는 아래와 같이 해더에서 Authorization 값을 가져오고 oauth2.0 방식인 Bearer 인 경우에만 토큰을 파싱한다.
@Slf4j
@Component
public class CommonUtils {

    public TokenInfo getAccessTokenInfo(HttpServletRequest request){
        TokenInfo tokenInfo = null;
        String authorization = request.getHeader(HttpHeaders.AUTHORIZATION);
        RemoteTokenServices tokenServices = new RemoteTokenServices();

        if(StringUtils.startsWithIgnoreCase(authorization, "Bearer")){
            Jwt jwt = JwtHelper.decode(StringUtils.replace(authorization, "Bearer ",""));
            Gson gson = new GsonBuilder().setFieldNamingPolicy(FieldNamingPolicy.LOWER_CASE_WITH_UNDERSCORES).create(); // snakecase to camelcase
            tokenInfo = gson.fromJson(jwt.getClaims(), TokenInfo.class);
        }
        return tokenInfo;
    }

}
그리고 controller 에서 해당 메소드를 호출하고 결과를 리턴한다
@Slf4j
@RestController
public class ResourceController {

    @Autowired
    private CommonUtils commonUtils;

    @RequestMapping("/main")
    public Object main(HttpServletRequest request){
        TokenInfo tokenInfo = commonUtils.getAccessTokenInfo(request);
        return tokenInfo;
    }
}
호출하면 아래와 같이 정상적으로 파싱한다.

그럼 다음 시간에는 로그인 세션을 redis 로 관리 하도록 변경 하도록 한다!
끝!
branch-03 참고 :: https://github.com/works-code/oauth2
GitHub - works-code/oauth2: 자체적 oauth 2 구축 스타터 코드
자체적 oauth 2 구축 스타터 코드. Contribute to works-code/oauth2 development by creating an account on GitHub.
github.com
branch-03 참고 :: https://github.com/works-code/oauth2-resource
GitHub - works-code/oauth2-resource: oauth2-resource
oauth2-resource. Contribute to works-code/oauth2-resource development by creating an account on GitHub.
github.com
'JAVA' 카테고리의 다른 글
| 하나의 브라우저에 멀티 세션(유저) 로그인 기능 구현 (0) | 2022.01.16 |
|---|---|
| 5분안에 구축하는 OAuth 서버 - 04 (5) | 2022.01.01 |
| 5분안에 구축하는 OAuth 서버 - 02 (1) | 2021.12.26 |
| 5분 안에 구축하는 Redis-Cluster (CentOS 에서 설치시 이슈) (1) | 2021.09.04 |
| 5분안에 구축하는 OAuth 서버 - 01 (5) | 2021.08.12 |


