
| 일 | 월 | 화 | 수 | 목 | 금 | 토 |
|---|---|---|---|---|---|---|
| 1 | 2 | 3 | 4 | 5 | 6 | 7 |
| 8 | 9 | 10 | 11 | 12 | 13 | 14 |
| 15 | 16 | 17 | 18 | 19 | 20 | 21 |
| 22 | 23 | 24 | 25 | 26 | 27 | 28 |
| 29 | 30 | 31 |
- 자바
- Kafka
- redash
- Docker
- 간단
- 머신러닝
- login
- Zeppelin
- java
- 클러스터
- 젠킨스
- config
- gradle
- Cluster
- 예제
- Jenkins
- EMR
- spring
- 자동
- fastcampus
- Mac
- 레디스
- hive
- Redis
- vue
- SpringBoot
- ec2
- 로그인
- aws
- 설정
- Today
- Total
코알못
5분안에 구축하는 OAuth 서버 - 01 본문

OAuth 서버는 인증서버로 인증된 클라이언트만 접근 하도록 할 수 있으며, 클라이언트 별로 권한도 부여 하여 권한 별로 처리 할 수 있도록 할 수 있다.
예를 들어 페이스북, 카카오톡 개발자 센터에 가보면 로그인 기능의 경우 OAuth 2.0 형태로 되어있으며, 내 앱에 페이스북, 카카오톡 로그인을 붙여 사용자 정보를 가져와서 SNS 로그인 기능을 구현할 수 있으며, 로그인 한 사용자의 페이스북, 카카오톡을 컨트롤 할 수 있다.
페이스북, 카카오톡 처럼 우리도 인증 서버를 구현하여 API 를 권한이 있는 클라이언트에게만 제공 할 예정이다.
일단 OAuth 2.0 플로우는 아래와 같다.

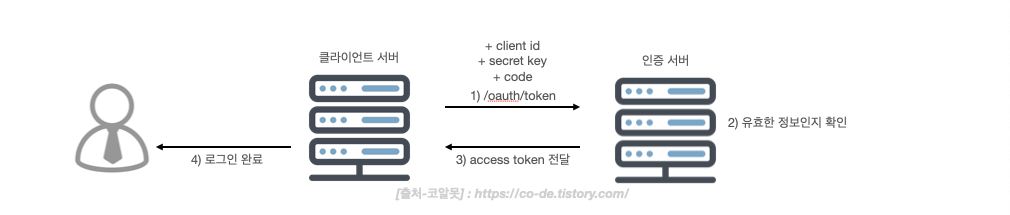

토큰 발급 방식(grant_type)은 총 4가지 존재하며, 기본적으로 헤더에 authorization 값(clientid:secretkey base64 인코딩한 값)을 넣어서 요청 해야 한다.
1. code (code를 발급받고 code로 access token 발급)
[1]. code 발행
- 아래 url은 기본 oauth2.0 코드 발급 URI로 절차 완료시 redirect_uri 로 code 가 발행된다.
- URL : http://localhost:8080/oauth/authorize
- Parameter : response_type=code, redirect_uri=코드 전달받을 URL, scope=read
[2]. access token 발행
- 발급 받은 코드를 가지고 token 을 발행 한다.
- URL : http://localhost:8080/oauth/token
- Parameter : grant_type=code, authorization_code=발급받은코드, redirect_uri=코드 전달받은 URL
2. password (id, pw 로 access token 발급)
[1]. access token 발행
- id, pw 로 토큰을 바로 발급 받을 수 있다.
- URL : http://localhost:8080/oauth/token
- Parameter : grant_type=password, username=아이디, password=패스워드, scope=read
3. client_credentials (바로 access token 발행)
- 다른 정보를 요하지 않고 authorization 에 clientid, secret key만 등록된 정보면 바로 발행해주며, 그런 특성으로 정말 별다른 인증 필요 없는 신뢰도가 높은 클라이언트에게만 해당 방식을 허용하도록 한다.
- 해당 방식은 별다른 인증을 요하지 않기에 위험성이 있어 refresh_token은 따로 발행 하지 않는다.
- URL : http://localhost:8080/oauth/token
- Parameter : grant_type=client_credentials, scope=read
4. refresh_token (refresh token으로 access token 발행)
- 해당 방식은 1, 2번으로 인증후 재 로그인 없이 자동 로그인을 구현하기 위함
- 1,2 방식으로 access_token 발행과 동시에 refresh_token 도 같이 발행해주기에 얻은 refresh token로 token 발행이 가능하다.
- URL : http://localhost:8080/oauth/token
- Parameter : grant_type=refresh_token, refresh_token=이전에 발급받은 refresh token, scope=read
자 구현해보자 !
프로젝트 구조는 아래 처럼 configuration(설정), controller(컨트롤러), repository(JPA 관련 설정), service(비즈니스로직), vo(의미별 독립된 객체) 로 이뤄진다.

# build.gradle
implementation 'org.springframework.boot:spring-boot-starter-data-jpa' // DB 쿼리 작성을 쉽게 하기 위함
implementation 'org.springframework.boot:spring-boot-starter-security' // 스프링 시큐리티
implementation 'org.springframework.boot:spring-boot-starter-thymeleaf' // 타임리프로 쉽게 웹 화면 구성을 위함
implementation 'org.springframework.boot:spring-boot-starter-web' // mvc 웹 구조 사용을 위함
implementation 'org.thymeleaf.extras:thymeleaf-extras-springsecurity5' // 타임리프 화면에서 스프링 시큐리티 사용을 위함
implementation group: 'org.springframework.security.oauth', name: 'spring-security-oauth2', version: '2.3.4.RELEASE' // spring oauth 2.0
implementation 'org.apache.commons:commons-lang3:3.8' // 유틸리티 사용을 위함
implementation 'com.konghq:unirest-java:3.7.02' // http 통신을 쉽게 하기 위함
compileOnly 'org.projectlombok:lombok' // 변수 get, set 함수 편리하게 만들기 위함
annotationProcessor 'org.projectlombok:lombok'
runtimeOnly 'mysql:mysql-connector-java' // mysql 사용
# application.yml
- DB 설정 및 사용할 포트 설정
spring:
  datasource:
    driver-class-name: com.mysql.cj.jdbc.Driver
    url: jdbc:mysql://localhost:3306/oauth2?serverTimezone=UTC&characterEncoding=UTF-8
    username: root
    password: root@1234
    initialization-mode: never # resource 에 있는 schema.sql 을 실행 (기본값: always, 생성안함: never)
  jpa: # DB 쿼리 작성 없이 코드로 쉽게 데이터 처리를 위함.
    show-sql: true
    database: mysql
    database-platform: org.hibernate.dialect.MySQL5InnoDBDialect
  main:
    allow-bean-definition-overriding: true # userDetailService 기존 스프링 제공 함수 안쓰고 정의한 함수로 바꾸기 위한 설정
server:
  port: 8081 # 사용 포트
# schema.sql
- schema.sql 파일을 만들어 initialization-mode 를 always 로 하여 프로젝트 실행시 테이블 생성하여도 되고, SQL 직접 접속하여 만드셔도 됩니다.
create table user(
    id varchar(20),
    password varchar(100),
    nickname varchar(100),
    state char(1)
);
- 데이터베이스 생성부터 사용자 데이터 insert 까지 쿼리이며, 사용자 패스워드는 '{암호화알고리즘}패스워드' 형식으로 저장해야 하며, 암호화 하지 않았다면 암호화알고리즘에 noop 를 넣으면 된다. (ex : {noop}password)
- 로그인시 {noop} 까지 입력 안해도 된다.
# mysql start
mysql.server start

$ mysql -u root -p
root@1234

mysql> create database oauth2;
mysql> show databases;
+--------------------+
| Database           |
+--------------------+
| oauth2             |
+--------------------+
9 rows in set (0.01 sec)

mysql> use oauth2;
Reading table information for completion of table and column names
You can turn off this feature to get a quicker startup with -A
Database changed

mysql> create table user(
    id varchar(20),
    password varchar(100),
    nickname varchar(100),
    state char(1)
);

mysql> show tables;
+------------------+
| Tables_in_oauth2 |
+------------------+
| user             |
+------------------+
1 row in set (0.00 sec)

mysql> desc user;
+----------+--------------+------+-----+---------+-------+
| Field    | Type         | Null | Key | Default | Extra |
+----------+--------------+------+-----+---------+-------+
| id       | varchar(20)  | YES  |     | NULL    |       |
| password | varchar(100) | YES  |     | NULL    |       |
| nickname | varchar(100) | YES  |     | NULL    |       |
| state    | char(1)      | YES  |     | NULL    |       |
+----------+--------------+------+-----+---------+-------+
4 rows in set (0.00 sec)

mysql> insert into user values ('yoolee','{noop}yoolee','corin','Y');
Query OK, 1 row affected (0.01 sec)

mysql> select * from user;
+--------+----------+----------+-------+
| id     | password | nickname | state |
+--------+----------+----------+-------+
| yoolee | {noop}yoolee   | corin    | Y     |
+--------+----------+----------+-------+
1 row in set (0.00 sec)
# vo
- 사용자 테이블 Entity 생성
스프링 시큐리티 사용시 유저 정보를 조회하는 UserDetailsService 인터페이스를 상속 받아 반환 해야 하는 사용자 정보 클래스가 UserDetails 인 loadUserByUsername 메소드를 구현해야 하는데, 우리가 만든 테이블 데이터로 내려주기 위해서는 우리가 만든 사용자 정보 User 클래스에 UserDetails 인터페이스를 상속 받아 @Override 어노테이션 붙어 있는 메소드를 구현(오버라이딩)해야 한다.
package com.code.vo;

import lombok.Data;
import org.apache.commons.lang3.StringUtils;
import org.springframework.security.core.GrantedAuthority;
import org.springframework.security.core.authority.SimpleGrantedAuthority;
import org.springframework.security.core.userdetails.UserDetails;
import javax.persistence.Column;
import javax.persistence.Entity;
import javax.persistence.Id;
import java.util.Arrays;
import java.util.Collection;

@Data
@Entity
public class User implements UserDetails {
    @Id
    @Column(nullable = true, unique = true, length = 20)
    private String id;

    @Column(length = 100)
    private String password;

    @Column(nullable = false, unique = true, length = 100)
    private String nickname;

    @Column(nullable = true, unique = false)
    private String state; // Y : 정상 회원 , L : 잠긴 계정, P : 패스워드 만료, A : 계정 만료

    // security 기본 회원 정보인 UserDetails 클래스 implement 하기 위한 기본 함수들..

    // 권한 (기본 권한 셋팅)
    @Override
    public Collection<? extends GrantedAuthority> getAuthorities() {
        return Arrays.asList(new SimpleGrantedAuthority("ROLE_USER"));
    }

    @Override
    public String getPassword() {
        return this.password;
    }

    @Override
    public String getUsername() {
        return this.id;
    }

    // 계정 만료
    @Override
    public boolean isAccountNonExpired() {
        if(StringUtils.equalsIgnoreCase(state, "A")){
            return false;
        }
        return true;
    }

    // 잠긴 계정
    @Override
    public boolean isAccountNonLocked() {
        if(StringUtils.equalsIgnoreCase(state, "L")){
            return false;
        }
        return true;
    }

    // 패스워드 만료
    @Override
    public boolean isCredentialsNonExpired() {
        if(StringUtils.equalsIgnoreCase(state, "P")){
            return false;
        }
        return true;
    }

    @Override
    public boolean isEnabled() {
        if(isCredentialsNonExpired() && isAccountNonExpired() && isAccountNonLocked()){
            return true;
        }
        return false;
    }
}
- 토큰 발행 관련 클래스
package com.code.vo;

import lombok.Data;
import org.codehaus.jackson.annotate.JsonIgnoreProperties;
import java.util.HashMap;
import java.util.Map;

/***
 * 토큰 관련 정보
 */
@Data
public class OauthToken {

    @JsonIgnoreProperties(ignoreUnknown = true)
    @Data
    public static class response{

        private String access_token;
        private String token_type;
        private String refresh_token;
        private long expires_in;
        private String scope;

    }

    @Data
    public static class request{

        @Data
        public static class accessToken{
            public String code;
            private String grant_type;
            private String redirect_uri;

            public Map getMapData(){
                Map map = new HashMap();
                map.put("code",code);
                map.put("grant_type",grant_type);
                map.put("redirect_uri",redirect_uri);
                return map;
            }
        }

        @Data
        public static class refrashToken{
            private String refreshToken;
            private String grant_type;

            public Map getMapData(){
                Map map = new HashMap();
                map.put("refresh_token",refreshToken);
                map.put("grant_type",grant_type);
                return map;
            }
        }
    }
}
# repository
- DB 쿼리를 자동으로 작성해주고 매핑해주는 JPA 를 정의 한다.
package com.code.repository;

import com.code.vo.User;
import org.springframework.data.jpa.repository.JpaRepository;

public interface UserRepository extends JpaRepository<User, Long> {
    User findById (String username);
}
# configuration
- oauth 설정으로 AuthorizationServerConfigurerAdapter를 상속 받으면 매개변수만 다른 오버로딩 함수인 configure가 존재하며 매개 변수는 각각 security, clients, endpoints 가 있다.
- 모두 오버라이딩하여 설정 하면 되는데 우선 clients, endpoints 설정만 변경하고 필요 할때 마다 차근차근 변경 할 예정이다.
package com.code.configuration;

import com.code.service.UserDetailService;
import org.springframework.beans.factory.annotation.Autowired;
import org.springframework.context.annotation.Configuration;
import org.springframework.security.oauth2.config.annotation.configurers.ClientDetailsServiceConfigurer;
import org.springframework.security.oauth2.config.annotation.web.configuration.AuthorizationServerConfigurerAdapter;
import org.springframework.security.oauth2.config.annotation.web.configuration.EnableAuthorizationServer;
import org.springframework.security.oauth2.config.annotation.web.configurers.AuthorizationServerEndpointsConfigurer;
import org.springframework.security.oauth2.config.annotation.web.configurers.AuthorizationServerSecurityConfigurer;

@EnableAuthorizationServer
@Configuration
public class Oauth2AuthorizationConfig extends AuthorizationServerConfigurerAdapter{

    @Autowired
    private UserDetailService userDetailService;

    @Override
    public void configure(AuthorizationServerSecurityConfigurer security) throws Exception {
        super.configure(security);
    }

    // client 설정
    @Override
    public void configure(ClientDetailsServiceConfigurer clients) throws Exception {
        clients.inMemory() // 클라이언트 정보는 메모리를 이용 한다.
                .withClient("clientId") // 클라이언트 아이디
                .secret("{noop}secretKey") // 시크릿키 ({} 안에 암호화 알고리즘을 명시 하면 된다. 암호화가 되어 있지 않다면 {noop}로 설정 해야 한다. 실제 요청은 암호화 방식인 {noop}를 입력 하지 않아도 된다.)
                .authorizedGrantTypes("authorization_code","password", "refresh_token") // 가능한 토큰 발행 타입
                .scopes("read", "write") // 가능한 접근 범위
                .accessTokenValiditySeconds(60) // 토큰 유효 시간 : 1분
                .refreshTokenValiditySeconds(60*60) // 토큰 유효 시간 : 1시간
                .redirectUris("http://localhost:8081/callback") // 가능한 redirect uri
                .autoApprove(true); // 권한 동의는 자동으로 yes (false 로 할시 권한 동의 여부를 묻는다.)
    }

    // 인증, 토큰 설정
    @Override
    public void configure(AuthorizationServerEndpointsConfigurer endpoints) throws Exception {
        endpoints.userDetailsService(userDetailService); // refrash token 발행시 유저 정보 검사 하는데 사용하는 서비스 설정
    }
}
- 시큐리티 설정
package com.code.configuration;

import org.springframework.context.annotation.Configuration;
import org.springframework.security.config.annotation.web.builders.HttpSecurity;
import org.springframework.security.config.annotation.web.configuration.EnableWebSecurity;
import org.springframework.security.config.annotation.web.configuration.WebSecurityConfigurerAdapter;

@EnableWebSecurity // 웹보안 활성화
@Configuration
public class SecurityConfig extends WebSecurityConfigurerAdapter {

    @Override
    protected void configure(HttpSecurity http) throws Exception {
        http.csrf().disable() // csrf 공격을 막기 위해 state 값을 전달 받지 않는다
                .formLogin() // 기본 제공하는 로그인 화면 사용
                .and()
                .httpBasic(); // http 통신으로 basic auth를 사용 할 수 있다. (ex: Authorization: Basic bzFbdGfmZrptWY30YQ==)
    }

}
- web mvc 설정
package com.code.configuration;

import com.code.service.UserDetailService;
import org.springframework.context.annotation.Bean;
import org.springframework.context.annotation.Configuration;

@Configuration
public class WebMvcConfig {

    // bean 에 등록하여 직접 구현한 서비스를 기본 서비스로 사용
    // 이미 빈이 생성되어 있기에 application.yml에 spring.main.allow-bean-definition-overriding 값을 true 로 하여 선언한 빈으로 설정 되도록 한다.
    @Bean
    public UserDetailService userDetailService(){
        return new UserDetailService();
    }

}
# contoller
- 지금 이 부분을 oauth 서버에서 구현 했지만 사실 사용할 클라이언트가 개발해야하는 코드다.
- 예를들어 페이스북 개발자 센터에 clientId, secretKey를 발급 받고 인증 코드를 발급 받을 redirecturi 를 등록하게 되는데 '/callback' URL이 등록한 redirecturi 페이지이며, 페이스북으로 부터 코드를 받아 토큰을 발급받는 코드를 작성하는 것이라고 보면 된다.
package com.code.controller;

import com.code.vo.OauthToken;
import kong.unirest.Unirest;
import org.apache.commons.codec.binary.Base64;
import org.springframework.web.bind.annotation.RequestMapping;
import org.springframework.web.bind.annotation.RequestParam;
import org.springframework.web.bind.annotation.RestController;

@RestController
public class OAuthController {

    // 클라이언트가 구현해야하는 코드 - 발급 받은 코드로 토큰 발행
    @RequestMapping("/callback")
    public OauthToken.response code(@RequestParam String code){

        String cridentials = "clientId:secretKey";
        // base 64로 인코딩 (basic auth 의 경우 base64로 인코딩 하여 보내야한다.)
        String encodingCredentials = new String(
                Base64.encodeBase64(cridentials.getBytes())
        );
        String requestCode = code;
        OauthToken.request.accessToken request = new OauthToken.request.accessToken(){{
            setCode(requestCode);
            setGrant_type("authorization_code");
            setRedirect_uri("http://localhost:8081/callback");
        }};
        // oauth 서버에 http 통신으로 토큰 발행
        OauthToken.response oauthToken = Unirest.post("http://localhost:8081/oauth/token")
                .header("Authorization","Basic "+encodingCredentials)
                .fields(request.getMapData())
                .asObject(OauthToken.response.class).getBody();
        return oauthToken;
    }

}
이제 모두 구현 하였고, 실행을 해보자!
1) code 를 이용한 토큰 발행
- 첫 페이지는 oauth 2.0 코드 발급 URL을 사용한다. (각 파라미터는 맞게 변경한다.)
:: http://localhost:8081/oauth/authorize?response_type=code&client_id=clientId&secret_key=secretKey&redirect_uri=http://localhost:8081/callback&scope=read
- 호출시 기본 로그인 페이지가 나온다.

- 로그인 정상적으로 되면 redirect uri 인 '/callback' 으로 코드가 전달 되고 내부 로직으로 받은 코드를 이용해 토큰을 발행하도록 처리해두었기 때문에 응답으로 access token 과, refresh token 이 발행 되며 설정된대로 토큰은 1분간 유효하다.

2)password 를 이용한 토큰 발행
- authorization 을 입력한다.

2. body 에 grant_type 에 password 를 넣고, username 에 id , password 에 패스워드를 입력하고 요청하면 끝!

3) client_credentials
- authorization 값을 입력한다.
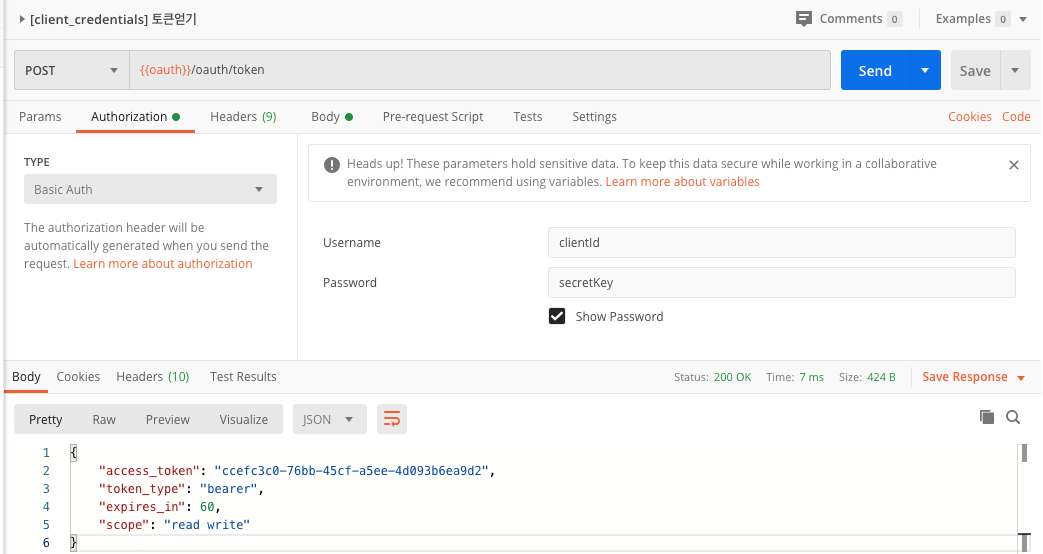
- grant_type 에 client_credentials 를 입력하여 요청하면 발행 되며 해당 방식은 refrash token 은 따로 발행 되지 않는다.

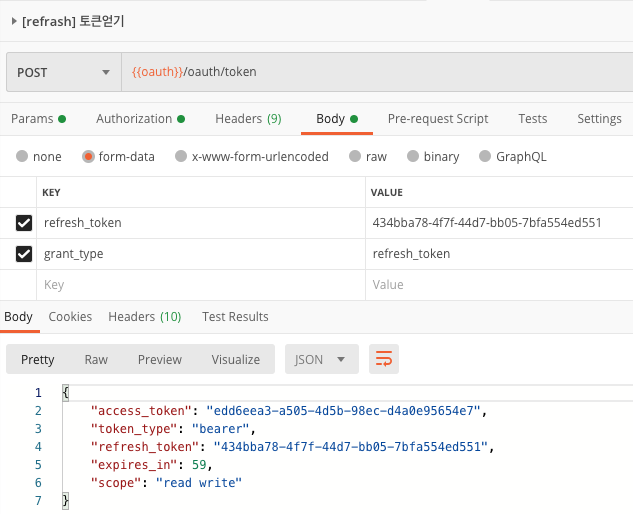
4) refresh_token 를 통한 토큰 발행
- refresh token 의 경우 1시간동안 유효하도록 설정 하였는데 해당 토큰으로 access token 을 발급 받을 수 있다.
- postman 을 이용하여 'oauth/token' URL 로 발급 받으면 되고, basic auth 로 clientId, secretKey를 입력하면 포스트 맨에서 Header 에 base64로 인코딩하여 전달해준다.

- 요청 값은 grant type 은 refresh token 을 이용한 토큰 발행이니 refresh_token 으로, refresh_token 에는 발급받은 토큰을 넣고 요청한다.

- 아래와 같이 토큰이 발행 된다.

참고로 access token 을 해커가 가져가면 API 를 맘대로 호출 가능하기에 만료시간을 짧게 가져가도 되며, 대신 refresh token을 길게 잡아 refresh token 으로 토큰을 재발행 하여 자동 로그인 기능을 구현하도록 한다. (refresh token 호출을 위한 정보도 해킹 당할시 설정을 통해 해당 클라이언트의 경우 refrash token 발행을 못하도록 막을 수 있다.)
자 다음으로!
해당 토큰이 있어야 호출 할 수 있는 resorce 서버를 구성한다
그전에 oauth 서버에서 몇가지를 수정해야 한다.
1. 토큰을 어딘가에 (저자는 DB) 저장한다. > resorce 서버에서 요청한 토큰이 유효한 토큰인지 검사하는데 어딘가에 저장되어 있어야 검색 할 수 있으므로 저장한다.
// 테이블 생성
-- access token 저장 > jwt 아닐때 유효 토큰 검증시 사용
CREATE TABLE IF NOT EXISTS `oauth_access_token`
(
    `token_id`          VARCHAR(256) NULL,
    `token`             BLOB         NULL,
    `authentication_id` VARCHAR(256) NOT NULL,
    `user_name`         VARCHAR(256) NULL,
    `client_id`         VARCHAR(256) NULL,
    `authentication`    BLOB         NULL,
    `refresh_token`     VARCHAR(256) NULL,
    PRIMARY KEY (`authentication_id`)
);
-- refresh token 저장 > jwt 아닐때 유효 토큰 검증시 사용
CREATE TABLE IF NOT EXISTS `oauth_refresh_token`
(
    `token_id`       VARCHAR(256) NULL,
    `token`          BLOB         NULL,
    `authentication` BLOB         NULL
);
// Oauth2AuthorizationConfig.class
    @Autowired
    private DataSource dataSource;

// 토큰 DB 저장
    @Bean
    public TokenStore tokenStore(){
        return new JdbcTokenStore(dataSource);
    }

    // 인증, 토큰 설정
    @Override
    public void configure(AuthorizationServerEndpointsConfigurer endpoints) throws Exception {
        endpoints.authenticationManager(authenticationManager) // grant_type password를 사용하기 위함 (manager 지정 안할시 password type 으로 토큰 발행시 Unsupported grant type: password 오류 발생)
                .userDetailsService(userDetailService) // refrash token 발행시 유저 정보 검사 하는데 사용하는 서비스 설정
                .tokenStore(tokenStore());
    }
2. 토큰을 검사하기 위해서 /oauth/check_token 을 인증서버에 호출하여 확인하는데 인증 서버에서 해당 API 접근을 허용한다.
// Oauth2AuthorizationConfig.class
    @Override
    public void configure(AuthorizationServerSecurityConfigurer security) throws Exception {
        security.tokenKeyAccess("permitAll()") // 모두 허용하지 않으면 해당 서버에서 토큰 접근이 불가능 하여 토큰을 DB에서 찾을 수 없다.
                .checkTokenAccess("isAuthenticated()") // 인증된 사용자만 토큰 체크 가능
                .allowFormAuthenticationForClients();
    }
3. 토큰 검사 API 호출 여부를 확인하기 위해 access log 를 남긴다.
// application.yml
server:
  tomcat:
    accesslog:
      enabled: true # access 로그 추가
    basedir: . # 위치
resource 서버는 아래와 같이 구현 한다.
1. 필요한 라이브러리 정의 (저자는 spring boot 2.6.1 / java 1.8)
// build.gladle
dependencies {
    implementation 'org.springframework.boot:spring-boot-starter-web' // api
    implementation 'org.springframework.boot:spring-boot-starter-security' // 스프링 시큐리티
    implementation 'org.springframework.security.oauth:spring-security-oauth2:2.3.8.RELEASE' // oauth
}
2. 리소스 서버임을 정의
// ResourceController.class
@EnableResourceServer // 리소스 서버임을 정의
@SpringBootApplication
public class Oauth2ResourceApplication {

    public static void main(String[] args) {
        SpringApplication.run(Oauth2ResourceApplication.class, args);
    }

}
3. 토큰 유효 체크 하는 방법, API 별 필요한 인증 정보 설정
// Oauth2ResourceConfig.class
package com.code.configuration;

import org.springframework.context.annotation.Configuration;
import org.springframework.security.config.annotation.web.builders.HttpSecurity;
import org.springframework.security.oauth2.config.annotation.web.configuration.ResourceServerConfigurerAdapter;
import org.springframework.security.oauth2.config.annotation.web.configurers.ResourceServerSecurityConfigurer;
import org.springframework.security.oauth2.provider.token.RemoteTokenServices;

@Configuration
public class Oauth2ResourceConfig extends ResourceServerConfigurerAdapter {

    // API 별 필요한 인증정보 설정
    @Override
    public void configure(HttpSecurity http) throws Exception {
        http.authorizeRequests()
                .antMatchers("/main")
                .access("#oauth2.hasAnyScope('read')")
                .anyRequest()
                .authenticated();
    }

    // 토큰 유효성 체크
    @Override
    public void configure(ResourceServerSecurityConfigurer resources) {
        RemoteTokenServices remoteTokenService = new RemoteTokenServices();
        remoteTokenService.setClientId("clientId");
        remoteTokenService.setClientSecret("secretKey");
        remoteTokenService.setCheckTokenEndpointUrl("http://localhost:8081/oauth/check_token");
        resources.tokenServices(remoteTokenService);
    }


}
4. API 구현
// ResourceController.class
package com.code.controller;

import org.springframework.web.bind.annotation.RequestMapping;
import org.springframework.web.bind.annotation.RestController;

@RestController
public class ResourceController {

    @RequestMapping("/main")
    public String main(){
        return "success";
    }
}
이제 테스트를 해본다!
토큰을 발행하면 아래와 같다!

해당 토큰이 정상적으로 DB에 저장됐는지 확인하면 데이터가 들어간것을 볼 수 있다.


발행 받은 토큰으로 API를 호출하면 정상적으로 success 가 나온다.

해당 API 호출 시점에 인증서버 access log 확인시 호출 마다 /check_token 으로 유효성 검사를 매번 하는것을 볼 수 있다.

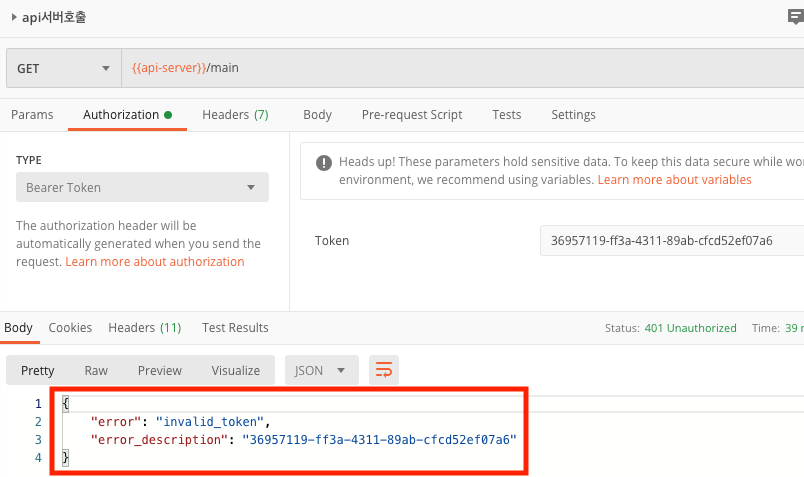
유효 시간인 60초 뒤에 호출해보면 아래와 같은 에러 메세지가 나온다.
refrash 토큰은 아직 유효하므로 access token 을 재 발행해본다!
다시 얻은 토큰으로 API 호출 해보면 정상적으로 호출 되는것을 볼 수 있다.

다음 게시글에서는 설정 부분을 서비스 가능한 형태로 수정해 볼 것 이다.
- 끝-
branch-01 적용 :: https://github.com/works-code/oauth2
branch-01 적용 :: https://github.com/works-code/oauth2-resource
GitHub - works-code/oauth2-resource: oauth2-resource
oauth2-resource. Contribute to works-code/oauth2-resource development by creating an account on GitHub.
github.com
# 참고 사항
1. /oauth/check_token 직접 호출해보기
- clientid:secretkey 를 base64로 암호화 한 값을 Authorization 의 값으로 해더에 보낸다. (basic auth 라고 부르며 postman 에서는 아래와 같이 입력시 알아서 해줌)

- body 에 확인하고 싶은 토큰을 입력 한다.

- 만료시 아래와 같이 만료 되었다는 메세지 노출

- 정상일시 회원정보 리턴

'JAVA' 카테고리의 다른 글
| 5분안에 구축하는 OAuth 서버 - 02 (1) | 2021.12.26 |
|---|---|
| 5분 안에 구축하는 Redis-Cluster (CentOS 에서 설치시 이슈) (1) | 2021.09.04 |
| 5분 안에 구축하는 로그인 서비스 - 쿠키&세션 (1) | 2021.07.17 |
| 5분 안에 구축하는 Redis Predixy (2) | 2021.06.01 |
| 5분 안에 구축하는 Redis-Cluster (5) | 2021.05.10 |


