
| 일 | 월 | 화 | 수 | 목 | 금 | 토 |
|---|---|---|---|---|---|---|
| 1 | 2 | 3 | 4 | |||
| 5 | 6 | 7 | 8 | 9 | 10 | 11 |
| 12 | 13 | 14 | 15 | 16 | 17 | 18 |
| 19 | 20 | 21 | 22 | 23 | 24 | 25 |
| 26 | 27 | 28 | 29 | 30 |
- 머신러닝
- 간단
- Cluster
- Mac
- hive
- spring
- aws
- ec2
- Zeppelin
- 로그인
- 클러스터
- gradle
- Redis
- SpringBoot
- Kafka
- EMR
- fastcampus
- Docker
- 예제
- 자동
- vue
- 젠킨스
- 자바
- 설정
- redash
- login
- 레디스
- java
- config
- Jenkins
- Today
- Total
코알못
5분 안에 구축하는 Redis-Sentinel + HAProxy 본문


HAProxy 란?
- 로드 밸런서
- 가상 IP 를 두어 여러 서버의 부하를 분산하는 기능
- 오픈소스, 무료
Redis 에 HAProxy 를 두는 이유는 무엇일까?
- 마스터 장애시 슬레이브가 마스터가 됐을때 Client가 마스터 관련 IP, PORT 를 수정 해주어야 하는 단점 보완
- 검색 해보면 대부분 해당 이유로 많이 나오지만 이전 포스팅인 [5분안에 구축하는 Redis-Sentinel] 를 참고하여 구성하면 해결 된다. (해당 구성이 어려운 경우를 말하는 것으로 보인다.)
- slave에서 읽기가 가능하도록 하기 위해 & 로드밸런싱 기능
- 이전 포스팅 방식으로 구현시 slave 는 데이터 백업용으로만 사용된다.
- HAProxy 를 사용하면 slave 에서도 읽기가 가능하여, Master의 부하가 분산된다.
- But, lettuce 를 사용하면 slave에서 읽기가 가능 하도록 설정 가능 (로드 밸런싱은 되지 않으며, Slave 하나를 읽기 노드로 선정하여 계속적으로 사용)
    // lettuce 사용시
    @Bean
    public RedisConnectionFactory redisConnectionFactory(){
        LettuceClientConfiguration clientConfiguration = LettuceClientConfiguration.builder()
                .readFrom(ReadFrom.REPLICA_PREFERRED) // 복제본 노드에서 읽지 만 사용할 수없는 경우 마스터에서 읽습니다.
                .build();
        RedisSentinelConfiguration redisSentinelConfiguration = new RedisSentinelConfiguration()
                .master("mymaster")
                .sentinel("localhost",5000)
                .sentinel("localhost",5001)
                .sentinel("localhost",5002);
        LettuceConnectionFactory lettuceConnectionFactory = new LettuceConnectionFactory(redisSentinelConfiguration, clientConfiguration);
        return lettuceConnectionFactory;
}- UI 를 제공하고 있어 redis 상태를 한눈에 보기 쉽다.
- 서버 추가 및 변경시 클라이언트 코드를 수정해야하는 단점 보완
- HAProxy 를 사용하면 client 에서 redis 연동시 haproxy ip, port 만 알고 있으면 되고, redis 서버 추가시 haproxy 에서만 수정하면 되므로
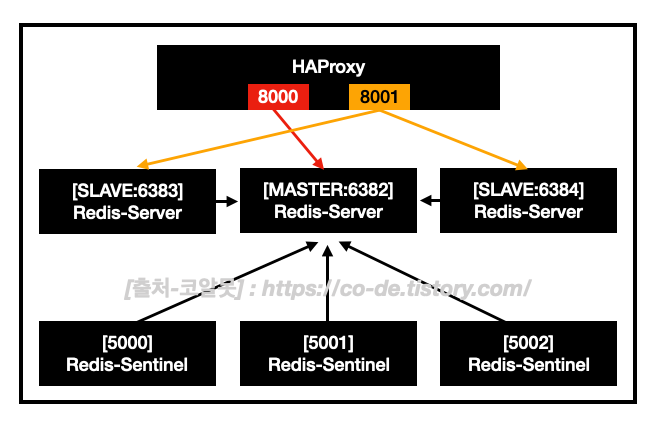
구성해보자!
사실 아래와 같이 구성하는게 Best 이지만 로컬 테스트인 만큼 해당 구성이 아닌 간단하게 구성해본다.

실제 구성할 아키텍쳐는 아래와 같다
1) HAProxy 를 설치해보자!
$ brew install haproxy
2) 설정을 해준다! (/etc/haproxy/haproxy.cfg)
#---------------------------------------------------------------------
# common defaults that all the 'listen' and 'backend' sections will
# use if not designated in their block
#---------------------------------------------------------------------
defaults
    mode                    tcp
    log                     127.0.0.1 local0
    retries                 3
    timeout http-request    10s
    timeout queue           1m
    timeout connect         5s
    timeout client          5s
    timeout server          5s
    timeout http-keep-alive 10s
    timeout check           1s
    maxconn                 10000
#---------------------------------------------------------------------
# main frontend which proxys to the backends
#---------------------------------------------------------------------
frontend ft_redis_master
    bind *:8000
    default_backend bk_redis_master
#---------------------------------------------------------------------
# round robin balancing between the various backends
#---------------------------------------------------------------------
backend bk_redis_master
    balance roundrobin
    log global
    option tcp-check
    tcp-check send info\ replication\r\n
    tcp-check expect string role:master
    server tcpapp1 localhost:6382 check
    server tcpapp2 localhost:6383 check
    server tcpapp3 localhost:6384 check
#---------------------------------------------------------------------
# main frontend which proxys to the backends
#---------------------------------------------------------------------
frontend ft_redis_slave
    bind *:8001
    default_backend bk_redis_slave
#---------------------------------------------------------------------
# round robin balancing between the various backends
#---------------------------------------------------------------------
backend bk_redis_slave
    balance roundrobin
    log global
    option tcp-check
    tcp-check send info\ replication\r\n
    tcp-check expect string role:slave
    server tcpapp1 localhost:6382 check
    server tcpapp2 localhost:6383 check
    server tcpapp3 localhost:6384 check
#---------------------------------------------------------------------
# admin uI
#---------------------------------------------------------------------
listen stats
 bind :80
 mode http
 balance roundrobin
 maxconn 10
 timeout client 5000
 timeout connect 4000
 timeout server 30000

 # Enable stats page
 stats enable

 # Hide HAProxy version
 stats hide-version

 #This is the virtual URL to access the stats page
 stats uri /haproxy_stats

 #Authentication realm. This can be set to anything.
 #Escape space characters with a backslash.
 stats realm HAProxy\ Statistics

 #The user/pass you want to use. Change this password!
 stats auth admin:admin

 #This allows you to take down and bring up back end servers.
 #This will produce an error on older versions of HAProxy.
 stats admin if TRUE
* 참고 : TCP 다양한 옵션은 아래 링크에서 확인 가능합니다.
HAProxy 시작한다!
// 서비스 시작 (해당 방식으로 기동시 나중에 서버 재기동시 자동으로 start 되며, 자동으로 /usr/local/etc/haproxy.cfg 를 읽어옴)
$ brew services start haproxy
or
// 서버 재기동시 자동으로 start 되지 않게 하려면 아래와 같은 방식으로 기동
$ haproxy -f /usr/local/etc/haproxy.cfg
UI 접속한다! (id, pw 는 설정한 admin, admin 이다.)
:: http://localhost/haproxy_stats
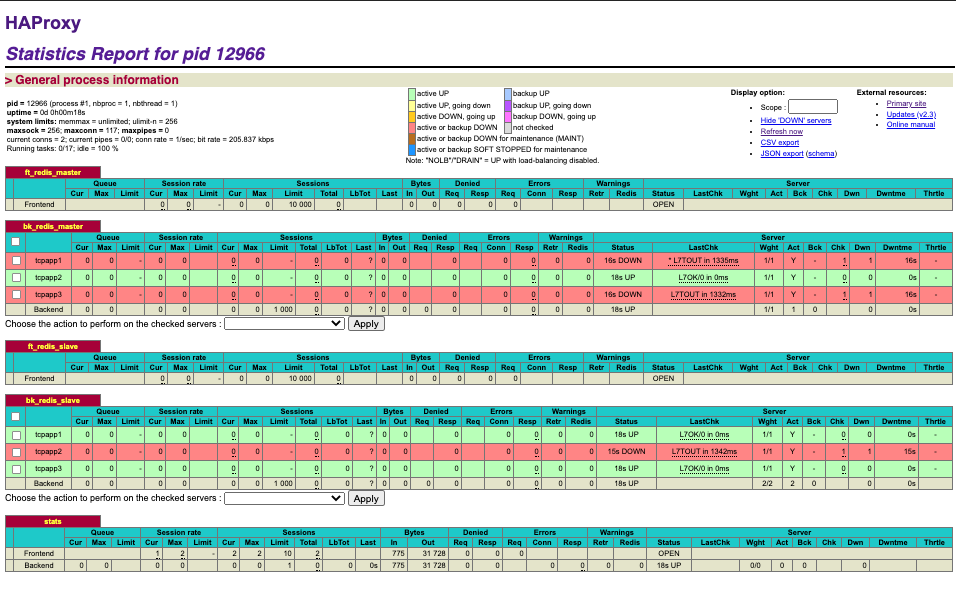
현재 02번 Master, 01번 & 03번 Slave 라 맞게 UP 상태로 되어 있다.
정상 모니터링이 되는지 Master를 죽여 본다.


- 죽은 노드 : 노란불 > 빨간불
- 마스터 승격 노드 (bk_redis_master): 빨간불 > 초록불
- 마스터 승격 노드 (bk_redis_slave) : 초록불 > 빨간불
죽은 노드를 다시 살리면!

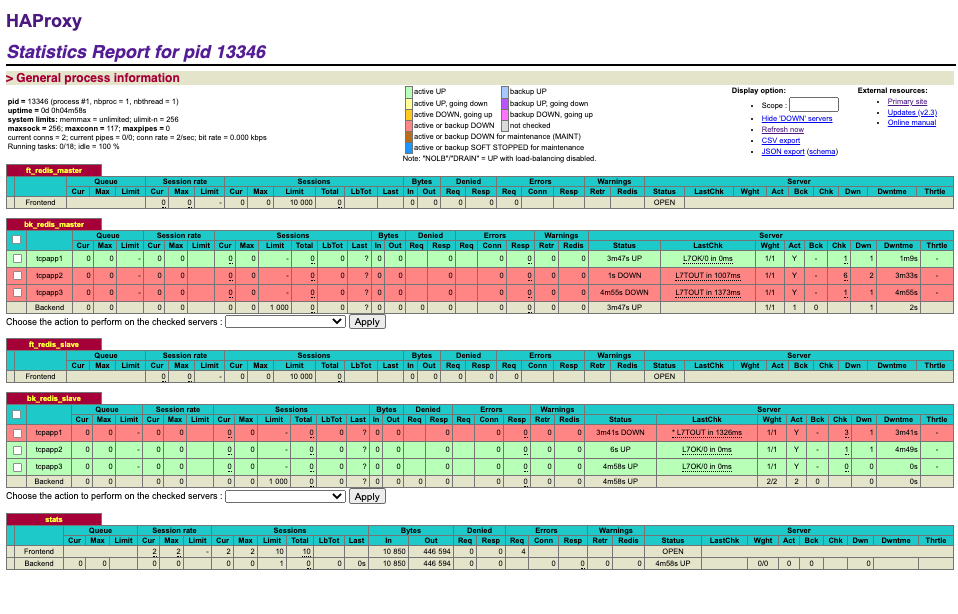
bk_redis_slave 의 tcpapp2번에 빨간불 > 초록불로 변경된것을 볼 수 있다!
정상적으로 연결 되었다면 Redis Client 로 Haproxy로 연결이 가능하다!
$redis-cli -h localhost -p 8000
localhost:8000> info server
# Server
redis_version:5.0.6
...
tcp_port:6383
...
executable:/Users/hongyoolee/redis/redis-5.0.6/src/redis-server
config_file:/Users/hongyoolee/redis/redis-5.0.6/redis_6383.conf
8000번은 Master 이므로 마스터에 연결된다.
8001번으로 접속해 보자!
// 6384 연결됨
$ redis-cli -h localhost -p 8001
localhost:8001> info server
# Server
...
tcp_port:6384
...
executable:/Users/hongyoolee/redis/redis-5.0.6/src/redis-server
config_file:/Users/hongyoolee/redis/redis-5.0.6/redis_6384.conf
localhost:8001> exit

// 6382 연결됨
$ redis-cli -h localhost -p 8001
localhost:8001> info server
# Server
...
tcp_port:6382
...
executable:/Users/hongyoolee/redis/redis-5.0.6/src/redis-server
config_file:/Users/hongyoolee/redis/redis-5.0.6/redis_6384.conf
localhost:8001> exit
roundrobin 방식이기에 순서대로 번갈아가면서 연결이 된다.
자바와 연동해보자!
:: github.com/works-code/redis-haproxy
works-code/redis-haproxy
redis-haproxy. Contribute to works-code/redis-haproxy development by creating an account on GitHub.
github.com
위 코드와 같이 작성 하면 된다.
-끝-
# reference
'JAVA' 카테고리의 다른 글
| 5분 안에 구축하는 Redis Predixy (2) | 2021.06.01 |
|---|---|
| 5분 안에 구축하는 Redis-Cluster (5) | 2021.05.10 |
| [Gradle] 실행 가능한 JAR 파일 만들기 (with 스프링 멀티 모듈) (1) | 2021.04.17 |
| 5분 안에 구축하는 Redis-Sentinel (1) | 2021.04.08 |
| 5분 안에 구축하는 Redis(레디스) (1) | 2021.02.15 |


